Step 1: Prepare the Masa (Dough)
- In a large mixing bowl, combine the masa harina and salt.
- Gradually add the warm water, stirring the mixture with your hands or a spoon to incorporate the water into the masa harina. Continue adding water until the dough is soft but firm. You should be able to roll it into a ball without it cracking.
- If desired, add 1 tablespoon of vegetable oil or melted butter to the dough to make it softer and more pliable.
- Once the dough is fully mixed, cover it with a damp cloth and let it rest for about 10 minutes. This helps the dough to become more elastic.
Step 2: Prepare the Fillings
- If you’re using refried beans, warm them up in a small pot until soft and easy to spread. You can also mash whole cooked beans if you prefer a chunkier filling.
- For the cheese, shred the queso fresco or your preferred cheese. Mozzarella works well as a milder cheese.
- If you’re using chicharrón prensado (pressed pork), chop it finely. You can also use ground beef, cooking it with onions and seasoning if preferred.
- For onion in your filling, sauté it briefly in a pan until softened and translucent.
Step 3: Shape the Pupusas
- Once your dough is ready, divide it into equal portions, roughly the size of a golf ball (about 10-12 pieces).
- Flatten each dough ball into a thick disc, about 3 inches wide. You can use your hands or a flat surface like a tortilla press (or a rolling pin).
- Add a spoonful of your desired filling to the center of the dough disc. Be careful not to overfill.
- Carefully fold the edges of the dough around the filling to seal it inside. Gently pinch the dough to fully enclose the filling and form a ball again.
- Flatten the ball into a thick disc, pressing gently but firmly. This will create your pupusa shape.
Step 4: Cook the Pupusas
- Heat a large, non-stick skillet or griddle over medium-high heat.
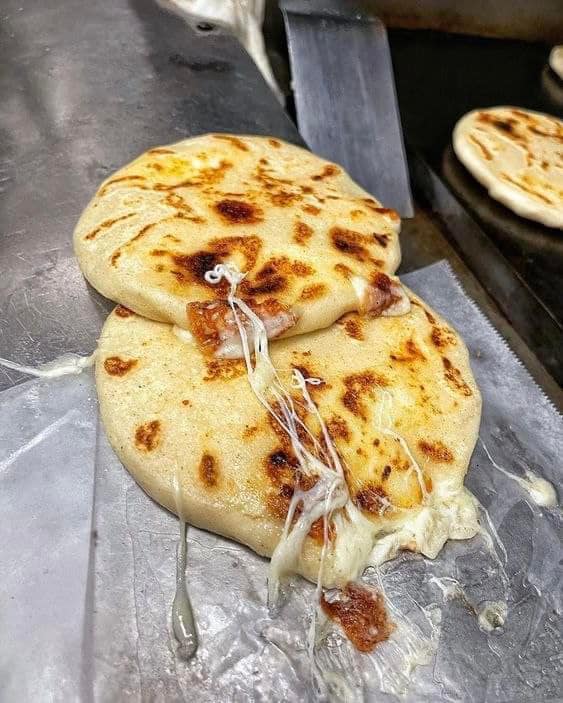
- Once hot, place the pupusas on the skillet and cook for 2-3 minutes on each side, or until golden brown and slightly crispy. You’ll notice a little bubbling as the dough cooks.
- Flip the pupusas carefully with a spatula, ensuring they don’t break open.
- Continue cooking for another 2-3 minutes until both sides are golden and the filling is melted inside. The outside of the pupusa should have a slightly crisp, golden crust.
Step 5: Serve and Enjoy!
- Once cooked, remove the pupusas from the skillet and let them rest for a minute or two.
- Serve with a side of cabbage slaw (traditionally called curtido), a tangy, lightly fermented cabbage salad with vinegar, and salsa roja for dipping.
- Garnish with extra cheese or chopped cilantro for added flavor.
Pro Tips for Perfect Pupusas
- Soft and Fluffy: The key to a tender pupusa is ensuring that the masa is neither too dry nor too sticky. Add water gradually to achieve the right consistency.
- Make Ahead: You can prepare the dough ahead of time and refrigerate it for up to 24 hours. Cover the dough with a damp cloth or plastic wrap to prevent it from drying out.
- Fillings Galore: Experiment with your favorite fillings—spinach and cheese, chicken, or vegetables are all great options.
- Chill the Dough: If you find the dough a bit difficult to handle, refrigerating it for 30 minutes can make it easier to work with.
Traditional Fillings for Pupusas
While cheese and beans are the most common fillings, pupusas can be customized to suit your taste. Here are a few traditional filling combinations:
- Queso y Frijoles (Cheese and Beans): The classic pupusa, combining smooth refried beans with soft, melted cheese.
- Queso y Loroco: Loroco, a Central American flower, adds a unique flavor when mixed with cheese. It’s often found in Salvadoran pupusas.
- Revuelta (Mixed): A combination of cheese, beans, and chicharrón (pork) or ground beef for a meaty option.
What to Serve with Pupusas
- Curdito (Cabbage Slaw): A tangy cabbage slaw, made with shredded cabbage, carrots, onions, vinegar, and a touch of salt, is the perfect accompaniment.
- Salsa Roja: A simple tomato-based salsa made with tomatoes, onions, and chilies adds a zesty contrast to the richness of the pupusas.
Storage & Reheating
- Storing: Leftover pupusas can be stored in an airtight container in the fridge for up to 3 days.
- Reheating: Reheat pupusas in a skillet over medium heat for a couple of minutes on each side to bring back that crispy exterior.
Final Thoughts
Making Homemade Pupusas is a fun, rewarding experience that brings the flavors of El Salvador into your home. These savory, stuffed tortillas can be enjoyed with endless variations, and they’re always a crowd-pleaser. Whether you’re making them for family dinner or a special occasion, homemade pupusas will surely become a favorite in your kitchen. Enjoy each bite of this flavorful, warm, and comforting dish.
